
Sustainable Mobile and Recreational Tiny Home
When I began my tiny home journey, I did not have much experience. Through the hands-on experience in building Goldie’s Tiny House I learned a lot of valuable lessons that I applied in this build while learning new lessons I wasn’t aware of prior.
The Plan
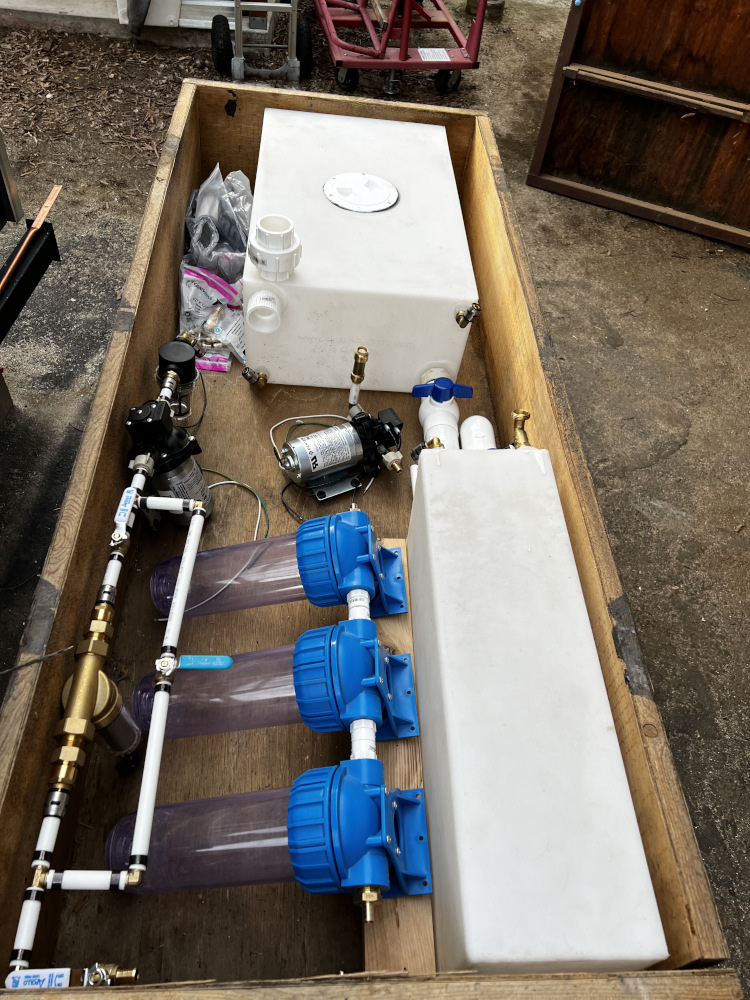
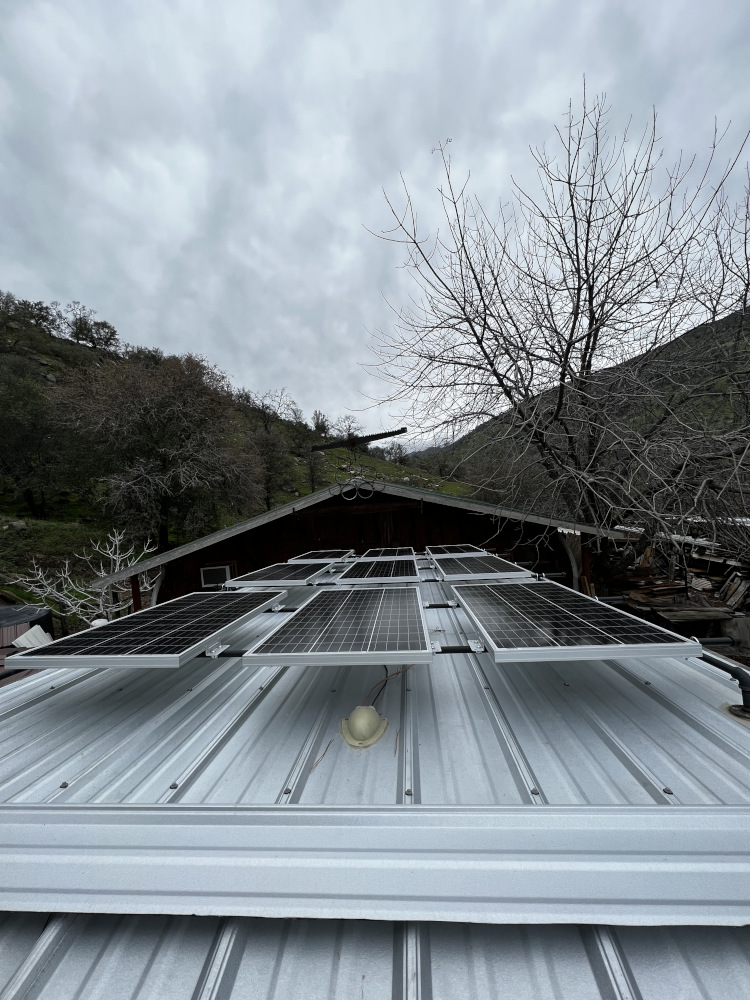
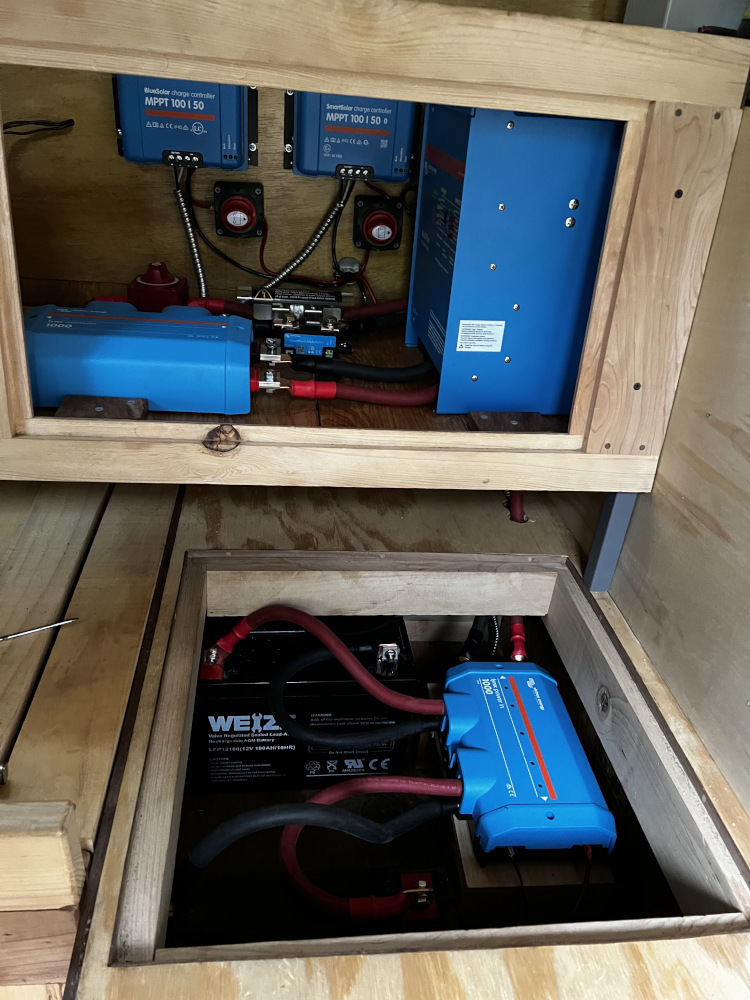
My goal was to build a sustainable tiny home that could get me to my property in Joshua Tree, California. The challenge was that I did not have easy access to water or electricity. Essentially, I wanted a self contained home stead without knowing what it truly takes to make a home energy and water independent. My plan was to build a tiny home that used solar energy generation to charge lithium iron phosphate batteries for power. For water management my plan was to use recirculating water system based on a multi stage reverse osmosis filtration system. This proved to be much more challenging that I thought it would take initially and this is the journey I embarked upon.
The Trailer
The lessons I learned from Goldie’s Tiny House were applied greatly to this tiny home. First lesson was to make sure you get a title to transfer if you plan on using it on a highway. However, that taught me a new lesson in the state of California; make sure the title is not past due because all past dues and late fees actually transfer to the new owner! Those fees can actually cost more than the trailer it self! So, buyer be aware!
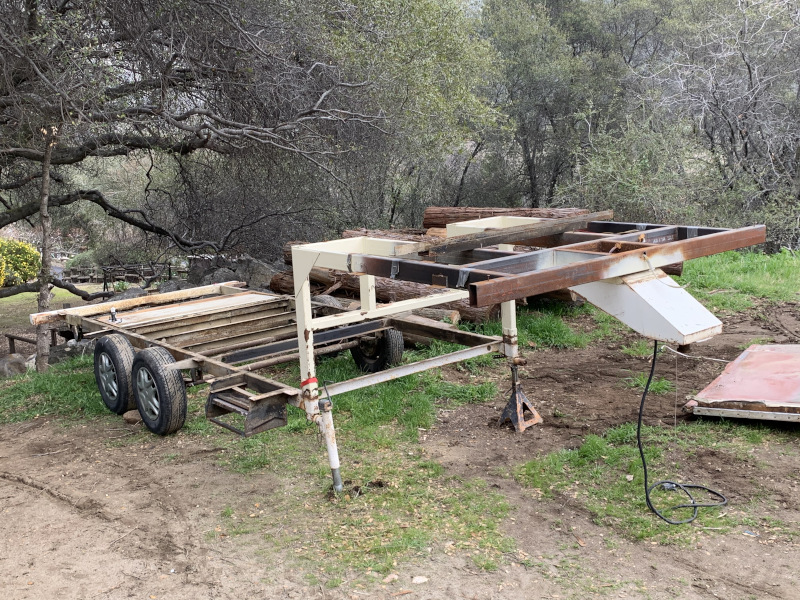
Refurbishing the Trailer
I took great care in refurbishing the trailer for this project. I used a grinder to remove all the rust to prep for an automotive paint. The wheels were removed and bearings repacked with grease and insure that everything was functional including the brakes.
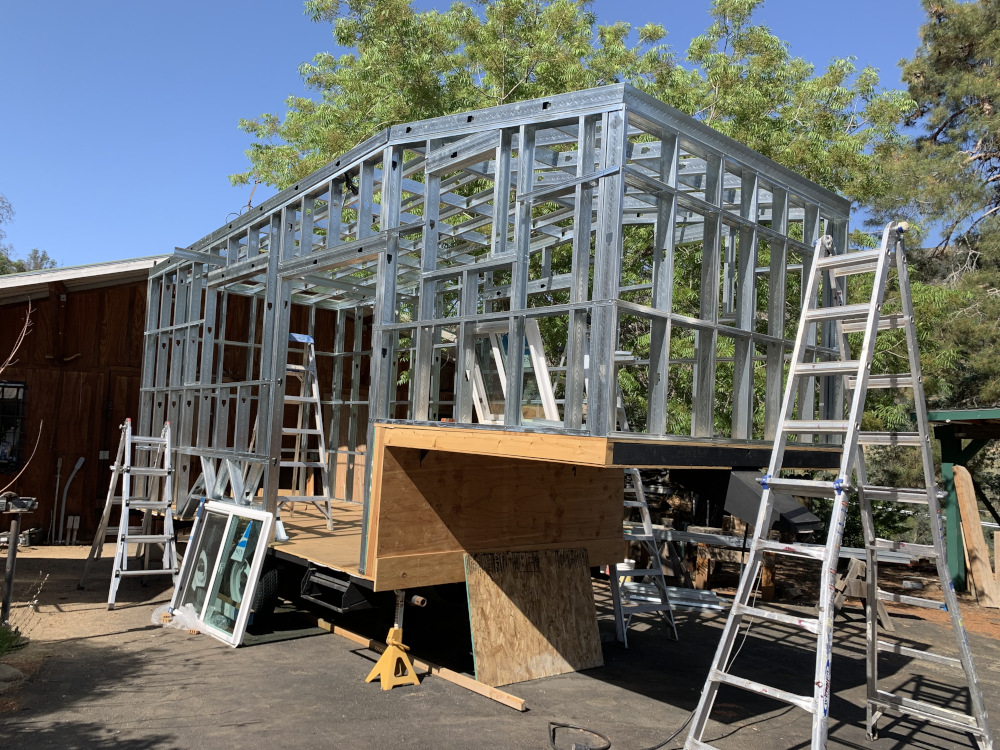
Framing
A lesson I learned from a physics perspective by my mentor, was to use rivets over sheet metal screws. Sheet metal screws are a good way to adhere two pieces of thin metal together, however I don’t feel I can trust my home going down the highway completely trusting a thin metal thread as opposed to a stainless steel 3/16” pop rivet. I felt if I was going to trust my home traveling down the highway, I would much prefer the structural integrity provided by a rivet over a sheet metal screw.
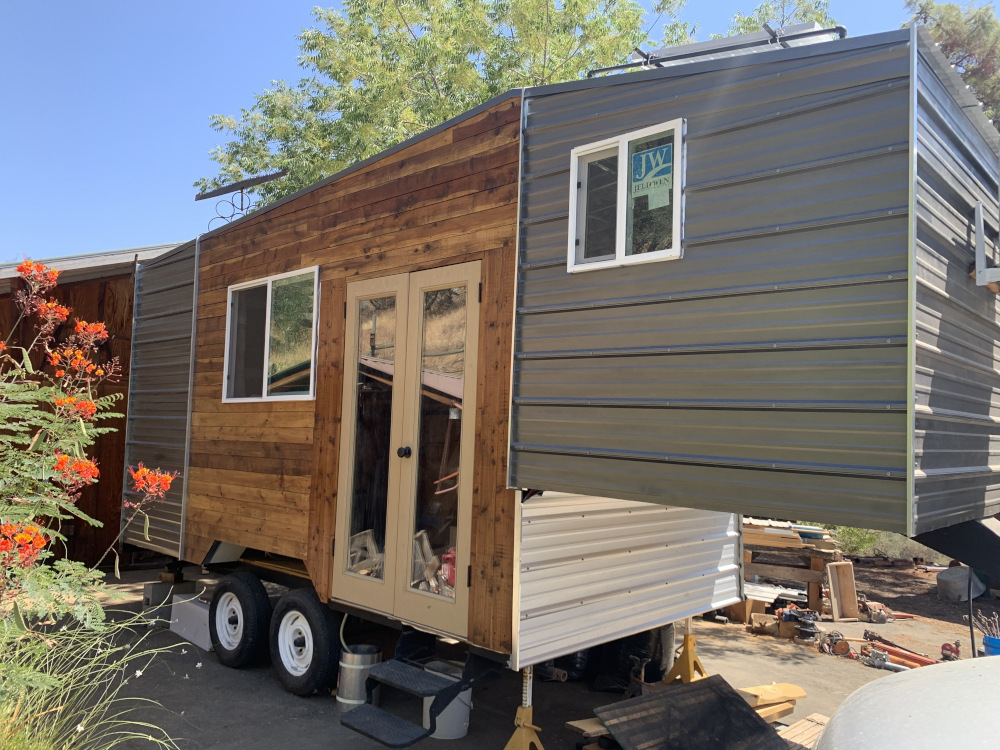
Siding
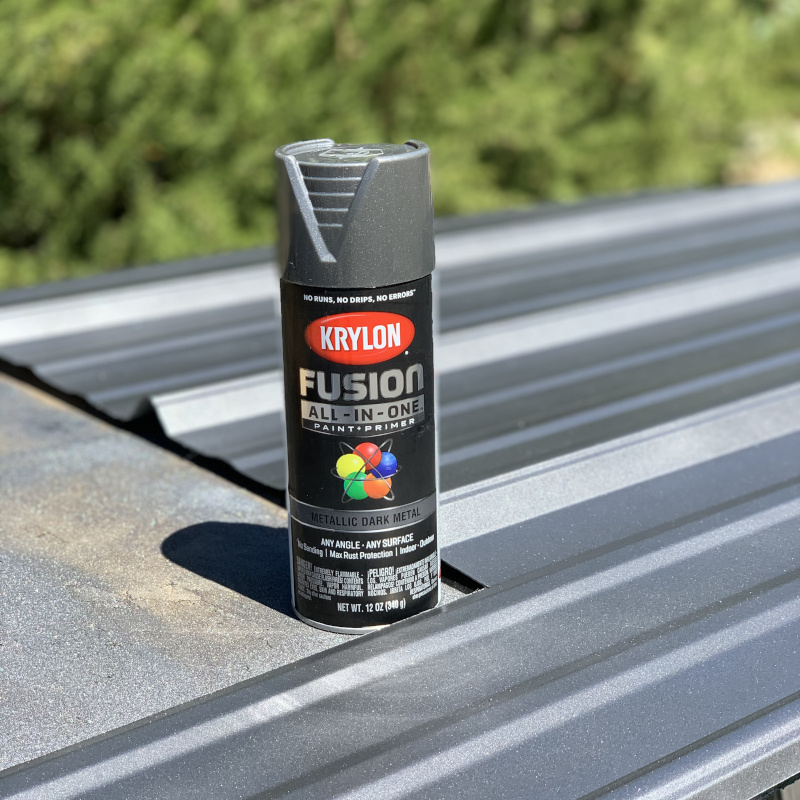
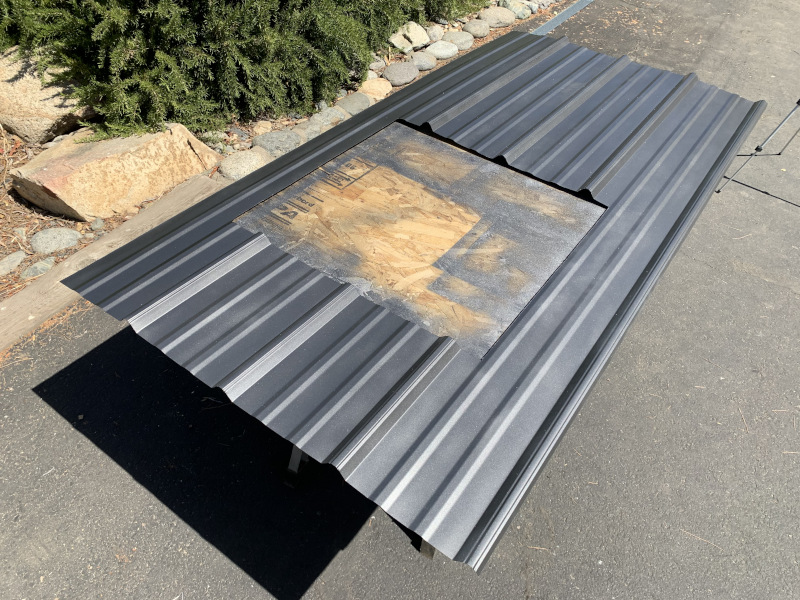
For the siding, I chose to make a mix of natural cedar ship lap and steel roof design to provide the best compliment for the appearance of this tiny home while providing the best weather protection forward and aft. The steel was originally a silver color that I just didn’t feel provided the best color. I looked into getting a dark grey panels however the cost was about 3 times the cost of the silver panels readily available.
Around that time I would stop into a local coffee shop called Wild Oaks (today is now called Java Express) where I would sometimes pull a book off the book shelf to read while I was in there. The book I appreciated the most was The Purpose Driven Life by Rick Warren. At the beginning of the book, a reader would sometimes leave little note cards in there with some special messages to fellow readers. One of those cards had some notes that ended with: “and don’t forget to leave a little sparkle every where you go.” Those words really resonated with me and helped define the color I chose for the siding
I ended up using a Krylon Fusion Spray paint that contained glitter in the formula to give my siding a bit of a sparkle.
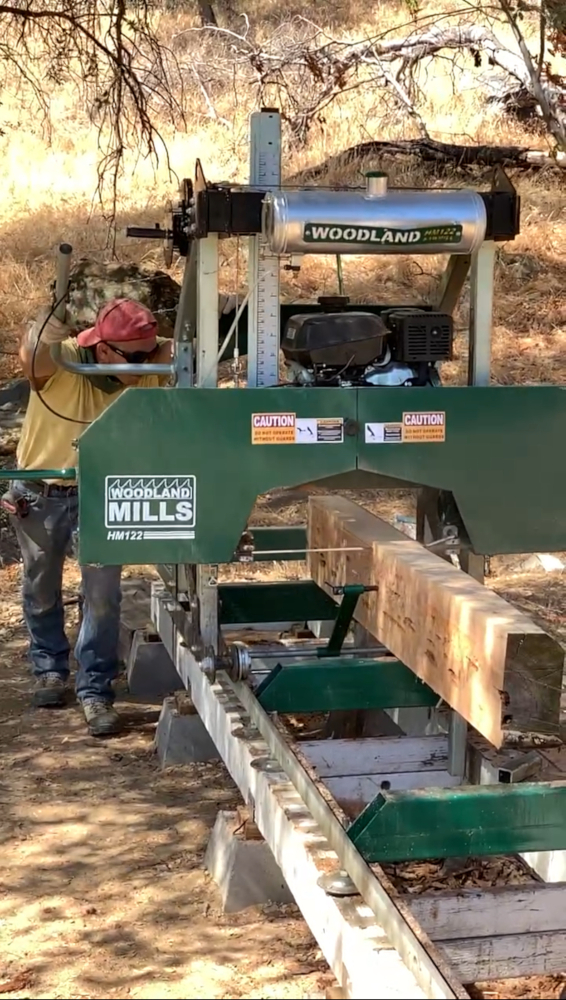
The cedar siding was an incredible process to learn. It all started from some cedar logs I acquired from the Sequoia National Forest. The bark beetle has wrecked havoc on our forests and a lot of timber had to be removed due to the trees dying and the timber poses risk for wildfires. My mentor owns a 22 inch band saw mill where I got to learn how to mill the logs into about 3/4″ planks. From there I ran them them through a planer to insure the side were parallel and then perfected the edges on the table saw. Then I used a router table to create the grooves I needed for ship lap and to allow water to naturally shed down the sides.
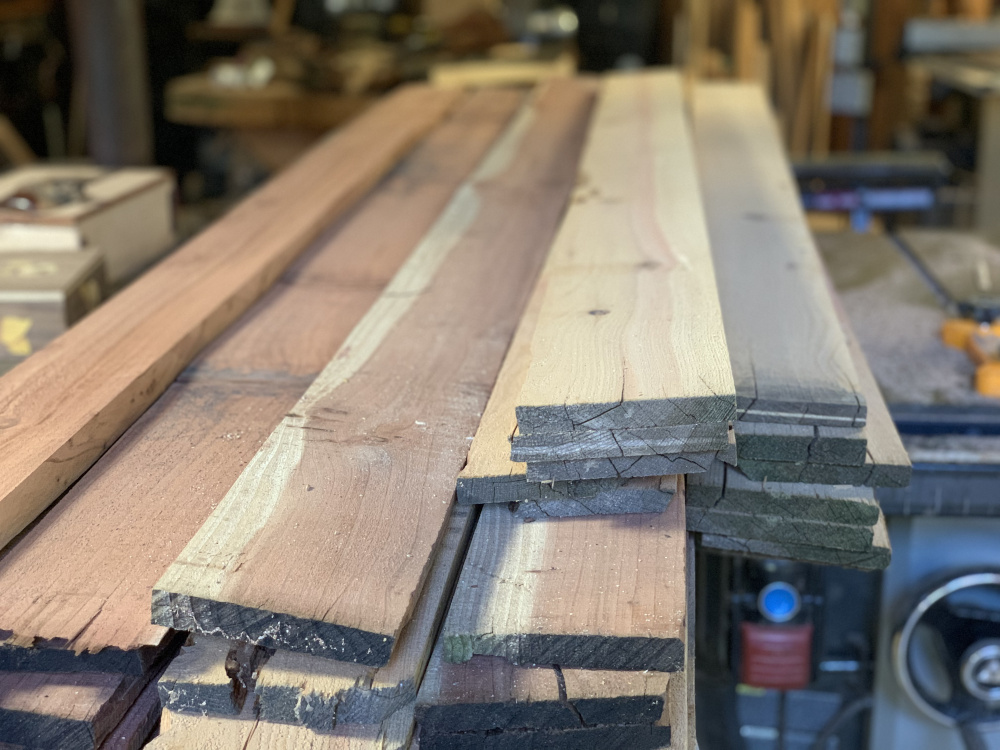
I actually tried a little different technique on the left side of the house that I learned during the process from watching various YouTube channels. One enhancement I learned was to create a drainage plane behind the siding. This was done by cutting strips of wood at 2″ wide and about a 1/4″ thick. These were then secured to the sides with finishing nails as I knew screws would be used later and didn’t want to screw into the top of another screw. This method allows water to have a place to escape if it does get behind the siding prolonging the life of the wood. What I liked best about this method is that it aligned the wood and screws in a very precise pattern and came out looking great. I would highly recommend this method to anyone looking at using a ship lap siding for their home as it appears to be more effective than others.

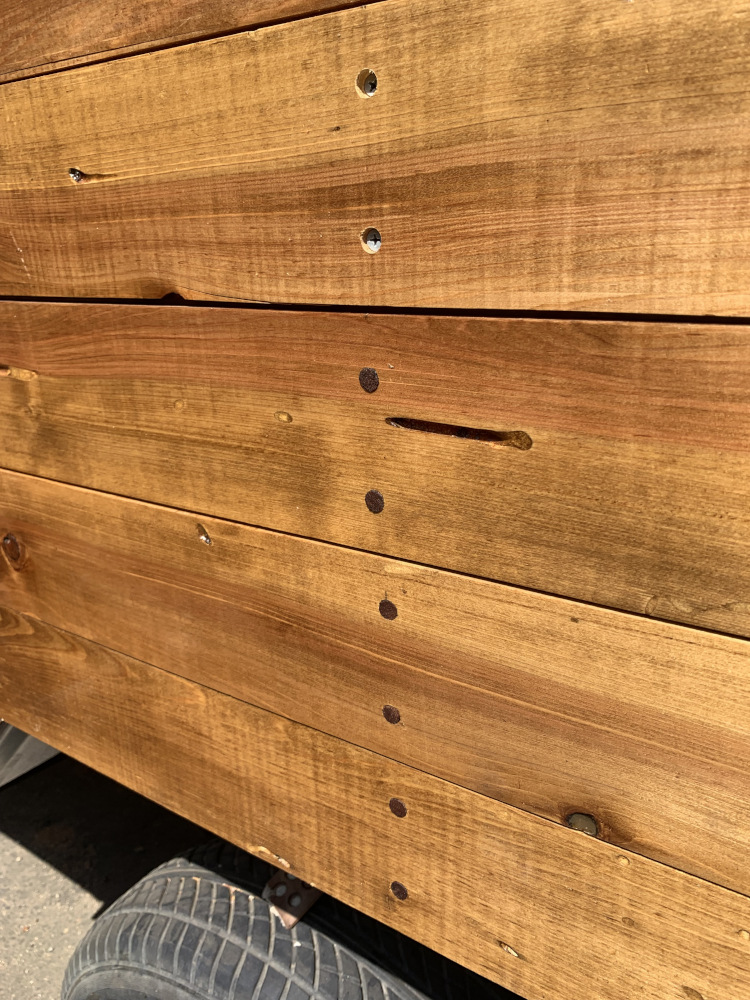
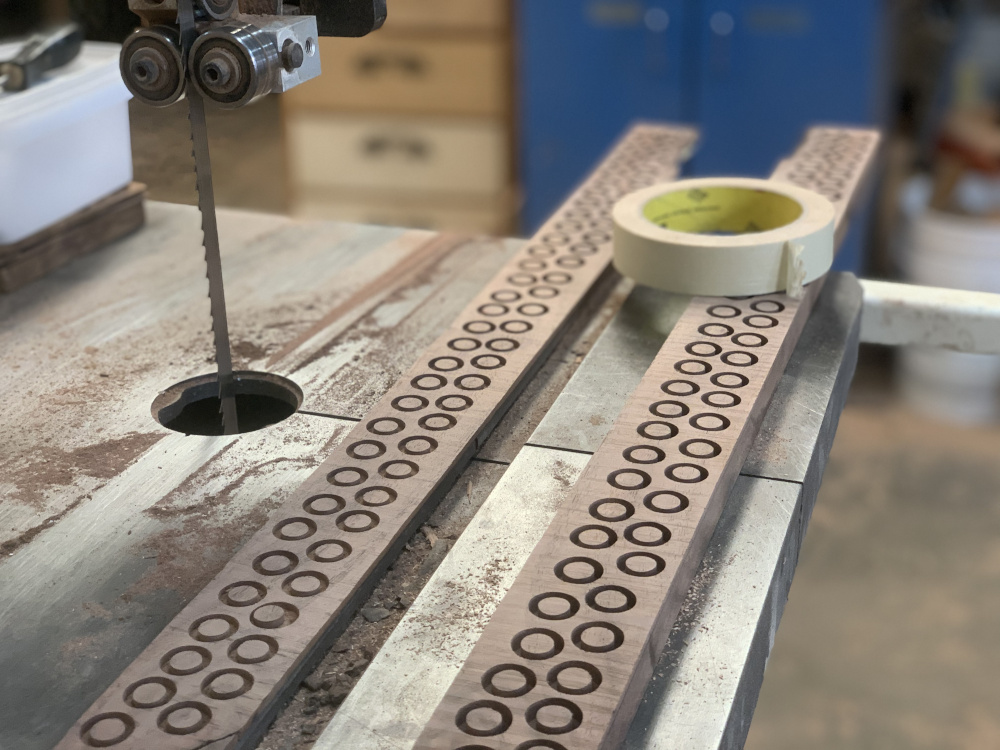
I used stainless steel screws to attach the siding to the tiny house, however this left another dilemma: exposed stainless steel screw heads did not have an attractive appearance… So, I chose to use my wood craft skills to make dark walnut plugs. These were quite the process to make and having to make 600 of these plugs was quite the challenge. *Stay tuned to my media and I will be sharing the full process and methods to do this during my updates on my website.
French Doors
French doors were an absolute must on my home. I feel that embracing the concept of the inner and outer worlds of life are essential to not only in the design in making a place feel larger than what it is, the concept of living in a tiny home allows the freedom to enjoy what the world has to offer more than being stuck indoors. The challenge I had in the doors on this tiny house was that I only had around 54″ from each side of the door frame. This is because I wanted to reuse the original stairs and design the doors, so that the stairs would lead up to the right side door. This was the door could be used on the road as a single door. My plan was to one day have property set up with a raised deck where the doors could be fully utilized.
This posed quite a problem because if you have ever gone to the store to buy french doors, you would know that the standard size for french doors starts at 60″x 82″. That means I was 6 inches over and that would put the door into the wheels of the trailer. Of course this means I needed a custom door set up, however that means the pricing shot up from what could have only been $500 to over $2,000…
Shopping at local suppliers and creators is something I enjoy because it keeps our local economies flourishing and enables us on to experience a piece of that American Dream of owning ones own business while solving problems for our community. My problem was finding a french door, with insulated glass (not that single pane stuff that’s energy inefficient) that had a maximum width of 54″ with the frame. I found the solution to my problem at Big Ben’s Discount Store in Visalia, California. They actually fabricated the doors on site and had some areas of unfinished doors.
As i searched through the rows of doors I discovered a pair of french “exterior” doors that were only 23 and half inch wide! That gave me 7 inches of room on each side of the doors to build my own door frame! The best part was that I picked those doors up for only around $180!
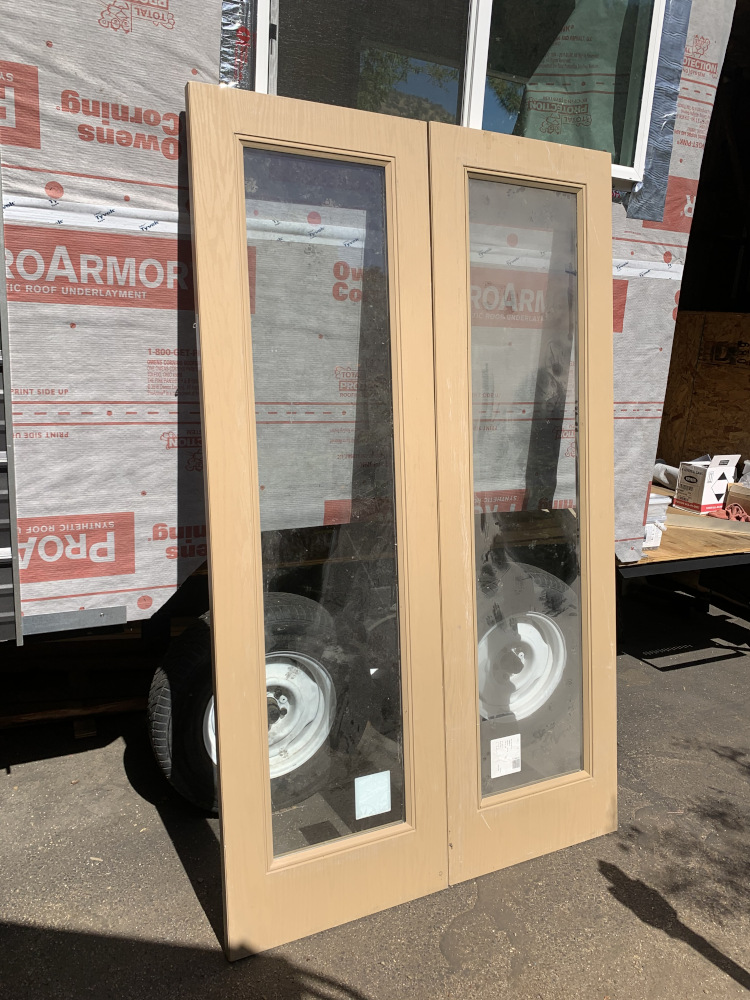

I was jumping for joy that day when I found these doors and later got them installed to give my tiny home the look it deserved and to complete the exterior.
Interior
Studio / Bedroom
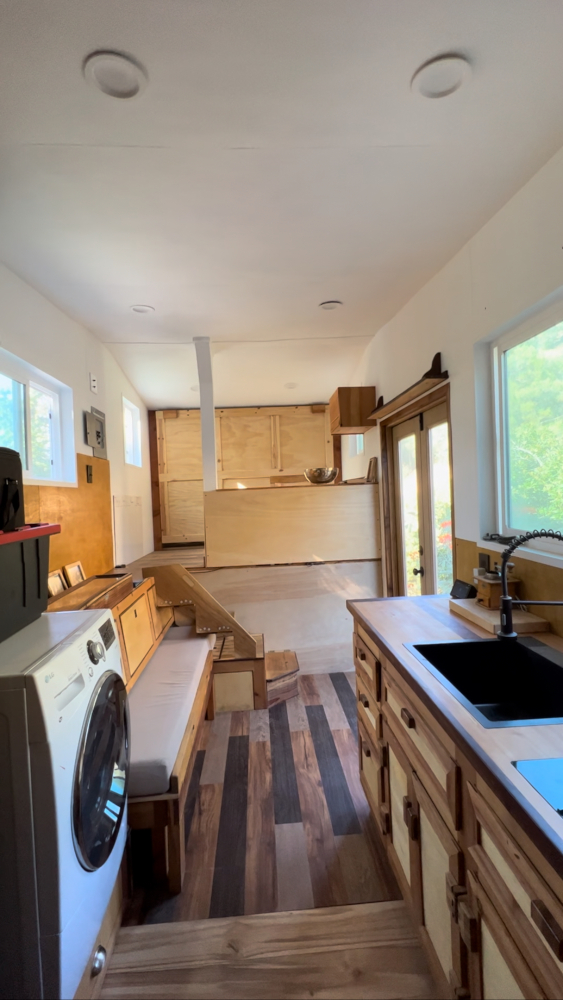
The intention of the studio and bedroom was to have a place to sleep and then convert into a place to work during the day. I was creating a plethora of content during my build process, however could not keep up with editing and posting the media due to a lack of space to focus on work. I built a Murphy bed to open the space up during the day and incorporated a TV lift kit to stow the TV away when not in use.
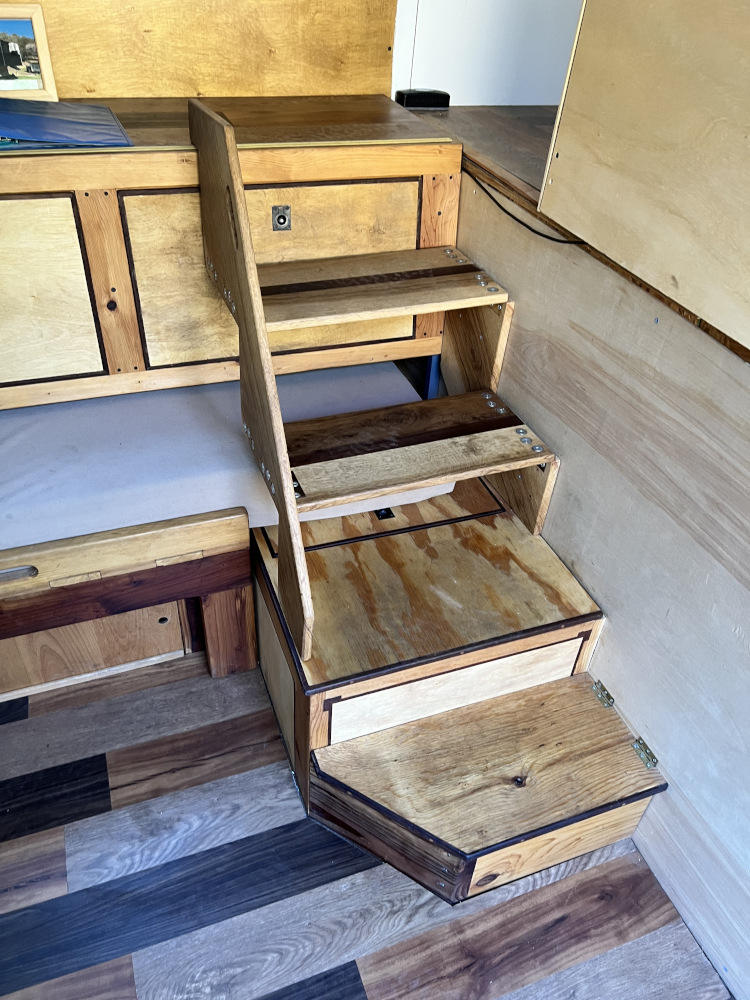
Stowaway Staircase
Having stairs to reach to the top of the fifth wheel hitch was quite a challenge when maximizing usable space in a tiny home. I chose to build a lower platform that would house the lithium battery bank for power and a fold-able staircase, so that the staircase move out of the way and allow the couch to slide out into a single bed. I used black oak wood because its strength compared to dimensional lumber (Pine, Douglas Fir, etc.) would enable me to use wood less than an inch thick as opposed to requiring almost 2 inch thick wood causing the stairs to be much wider than I wanted. The slab of Black Oak I found was quite warped and weathered. As a result, I cut it into smaller sections and then used strips of walnut to create a stunning visual appeal. Utilizing some reclaimed door hinges I was able to get the folding action to unfold while the stairs stowed away for the bed.
Butcher Block Style Kitchen Counter
This project was my second attempt at making a kitchen counter for a tiny home and I really did my best to up my skills. I used a mixture of cedar wood to lighten the counter and walnut wood to enhance structural integrity while giving the best visual appeal as possible.

Wooden Hinges with a barrel-less design.
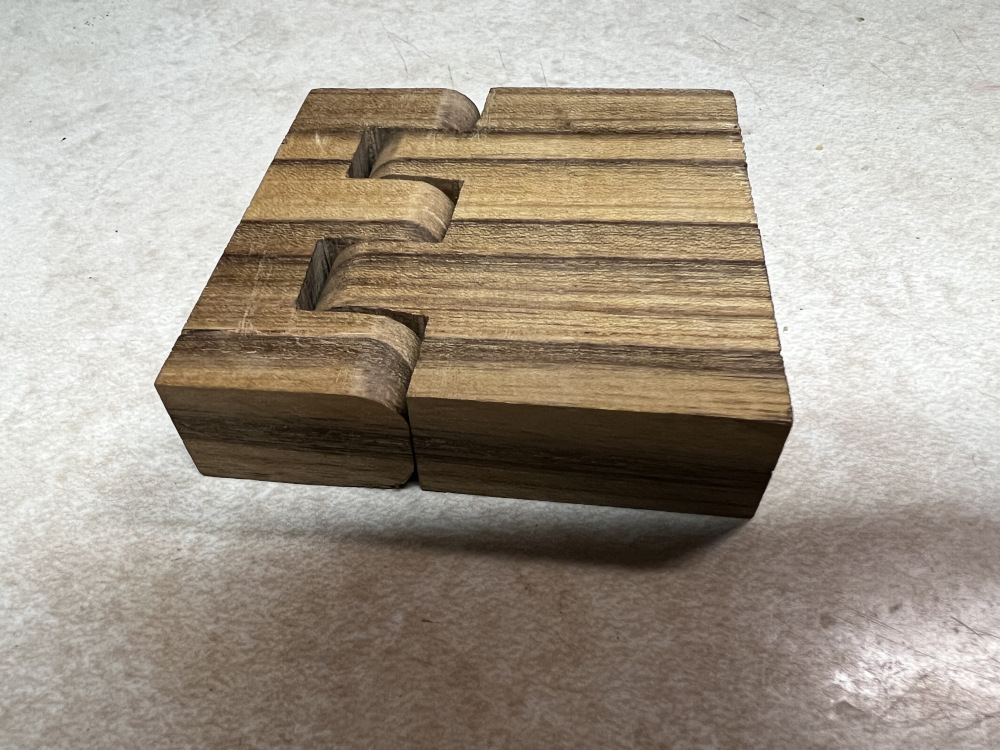
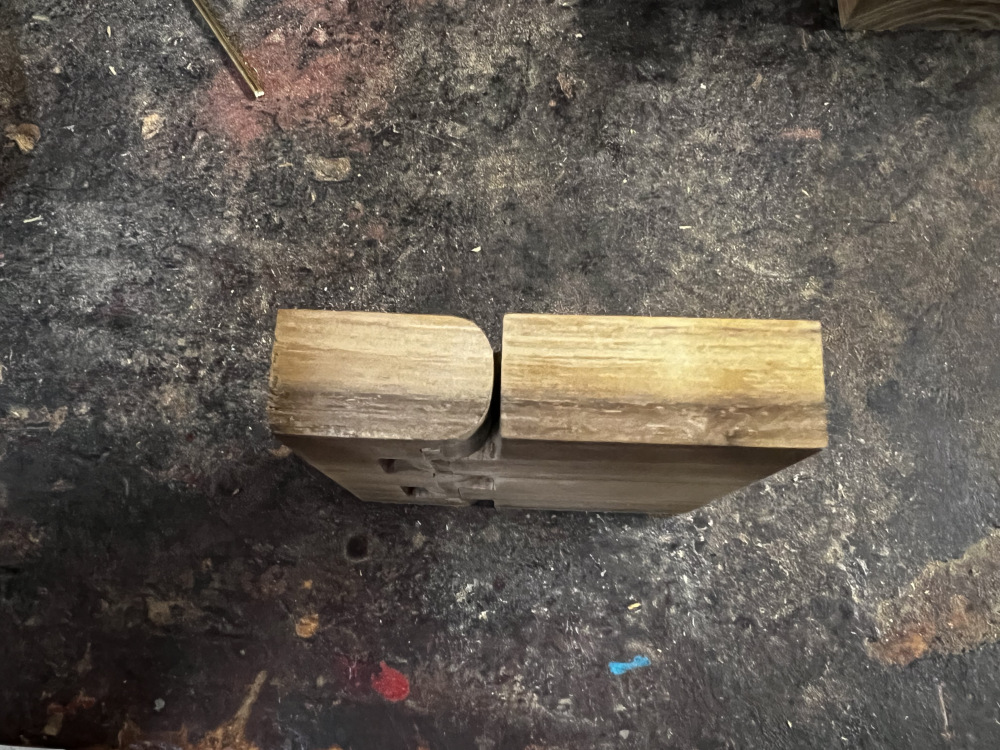
One of my favorite points to my tiny house would have to be the custom kitchen counter I created. While the best part of the cabinetry would be a barrel-less design wooden hinges. I used a scroll saw, to cut a precise parts from one consecutive piece of black oak. The wood had phenomenal grain and cooring
*The greatest lessons I learned in this project wasn’t about building a home, it was actually what I learned in building my own character in life.
Leave a Reply